EN  中

Replacing Limitorque L-120 with Bernard SD in Steam-Temperature Control: Retrofit and Commissioning

source:    date:2026-10-01

Fig. 1 Superheater outlet temperature control system

Per site conditions the total-air feedforward was dropped. The superheat setpoint is not a constant but load-related: Fig. 1 uses first-stage pressure as the load signal, summed through a function generator with the operator's bias to form the setpoint. Because the setpoint-to-load relation differs between constant-pressure and sliding-pressure operation, two function generators are used — CLB-FX1 for constant pressure, CLB-FX2 for sliding pressure; per commissioning, the first-stage-pressure addition to the setpoint has been zeroed.

Auto/manual selection and interlocks are in Fig. 2: without MFT and above 30% load (37.5 MW), if both superheat spray-valve commands exceed 1%, the spray water block valve opens; on MFT or below 30%, any of actuator fault, control fault, bad superheater-outlet signal or bad secondary-desuperheater outlet signal forces the sprays to manual; when both spray-valve commands fall below 0.5%, the block valve closes.
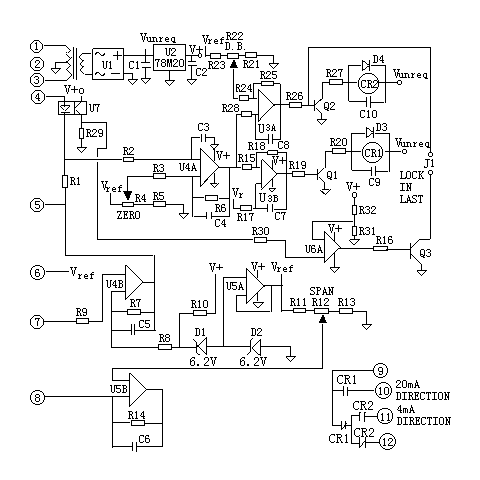
Fig. 2 Auto/manual control and interlock logic

(1) The L-120 actuator

The Limitorque actuator opens and closes the spray valve while limiting stem torque and thrust, protecting all valve operating parts against overload, mispositioning or jamming (Fig. 3).
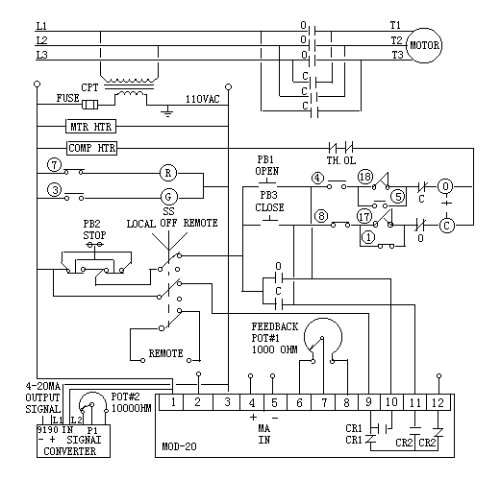
Fig. 3 L-120 actuator principle

In LOCAL mode the PB1 open and PB2 close buttons on the actuator panel operate it: pressing either energises the open or close coil, closing main-circuit contact (O) or (C) — used during commissioning and emergencies. In REMOTE mode the output relays CR1/CR2 on the servo board close control-circuit contacts (O)/(C) — these parallel PB1/PB2. In OFF, or with PB2 pressed, the 115 V AC control supply is cut and only the handwheel works. Travel switches 3 and 7 drive the panel red/green lamps; travel switches 1, 5, 4, 8 and torque switches 17, 18 serve full-open, full-close and intermediate limits; normally-closed contacts (O) and (C) provide open/close interlocking.
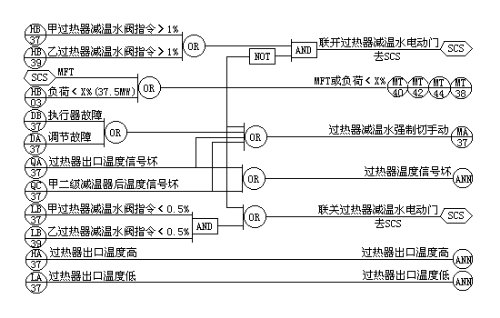
Fig. 4 MOD-20 servo board principle

In Fig. 4, after transformation, rectification, filtering and regulation, V+ powers the op-amps. The DCS command at terminals 4/5 is compared with the feedback at 7/8; the larger decides whether CR1 or CR2 energises. Span, zero and dead band adjust via potentiometers R12, R4 and R22.

Commissioning after installation:

  • 1) Power off; wind the handwheel to 50% valve position (watch the stem cold); the 1 kΩ coaxial potentiometer should read about 500 Ω — if not, loosen its fixing screw and rotate until it does.
  • 2) Power up in LOCAL; press an open/close button then quickly STOP, watching motor direction; if reversed, swap any two of L1/L2/L3.
  • 3) Electrical limits — close first, then open. Close limit: wind the valve fully closed (the valve crew confirms); push in the middle clutch and rotate half a turn so the pin stays depressed; turn the screw marked CLOSE until the close limit switch just actuates. If the valve seats before the switch trips, keep turning the screw with the closing direction until it presses; if the switch trips early, turn against the closing direction until the valve fully seats with the switch just made. Reset the clutch, then set the open limit the same way: limit late — turn with the screw direction; early — against it.
  • 4) Torque limit switches: open and close sides each have a dial; adjust their screws per the dial as needed (torque switches serve seating and jam protection and are generally left alone).
  • 5) Feedback signal: adjusted as for ordinary ZKJ actuators.

(2) Bernard SD

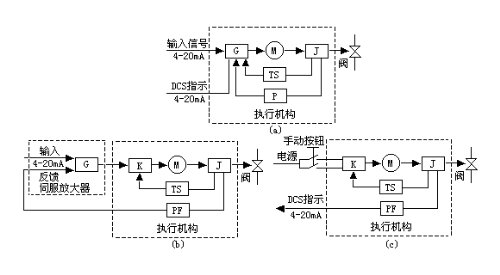
Bernard SD actuators come as modulating (a), external-servo (b) and remote-control (c) types: modulating units serve first superheat, first reheat and second reheat; the external-servo (CR-2) type serves second superheat; the remote type serves first-stage desuperheating (Fig. 5).
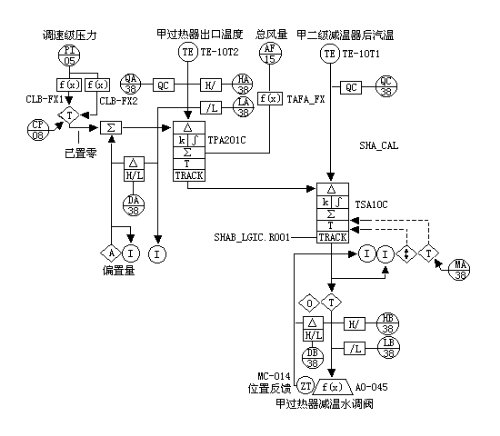
Fig. 5 Bernard SD principle (G: GAMX-2000 servo amplifier; M: motor; J: reducer; TS: torque/travel limiter; P: travel sensor potentiometer; PF: position transmitter)

Layout and wiring of motor, limit switches, servo and transmitter in the modulating unit are shown in Fig. 6.
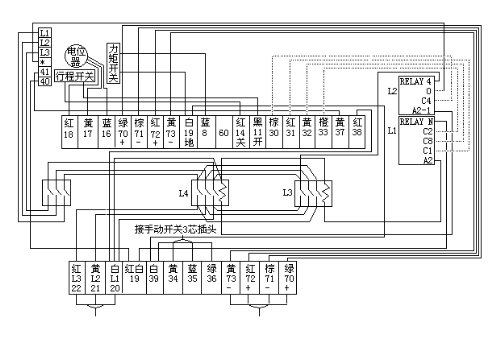
Fig. 6 Bernard SD modulating actuator principle

2.1 Torque and travel limits

A bevel gear on the clutch sleeve's upper drive lug drives the gear limit switches, so the switches connect directly to the actuator output and, correctly set, track valve position in manual as in electric operation. The worm and shaft pass through two spring assemblies: when torque arises the worm moves axially against a spring; each assembly is pre-calibrated so a given compression means a given torque; the worm's motion trips the torque switch, cutting motor power. Torque switches are adjustable to pre-set torques.

Phase check: with the cam turning clockwise, press the OPEN switch with a screwdriver — the actuator must stop. If not, cut power immediately, swap any two supply phases and recheck. Clockwise cams use the CLOSE switch the same way.
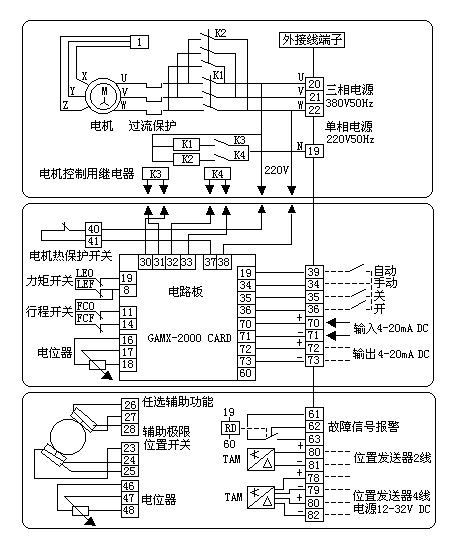
Fig. 7 Bernard SD wiring principle

2.2 Commissioning method

  • 2.2.1 Rotation direction: wind the handwheel to mid-travel; set AUTO/MAN to MAN; pre-set local potentiometer P1 to mid-position (see the GAMX-D board diagram). Power up — the actuator runs to P1's position, then rotates one way. Press that direction's limit switch with a screwdriver: rotation must stop; if not, cut power, swap two phases and retry. Once working, the actuator rests at mid-position; turning P1 then moves it under control between 0° and 90°.
  • 2.2.2 Dead band: adjust P3 (multi-turn potentiometer) — anticlockwise reduces the dead band.
  • 2.2.3 Travel (end-position) adjustment: power off; open the travel box to expose the cam mechanism. The cam disc holds four coloured, numbered plates — blue 4 and black 3 control start and end. For the closed position, align a screwdriver with adjusting screw 4, push down and rotate the cam towards close until its lobe just trips the close limit switch; likewise adjust cam 3 to just trip the open switch. Then tighten the three bracket screws.
  • 2.2.4 Zero (0%): set MAN, power up, turn P1 to the 0% end so the actuator runs toward CLOSE. If it stops before the close limit switch: loosen screws 9, rotate the potentiometer slowly — the actuator follows until the cam stops just before the close switch with the LED just extinguished — then retighten. If the actuator keeps turning past the close position (even with the switch tripped, red LED still lit), turn the potentiometer the other way until the LED just goes out, then retighten.
  • 2.2.5 Span (100%): turn P1 to the 100% end; the actuator runs toward OPEN. If it stops short (LED out), turn span potentiometer P2 clockwise until it stops just before the open switch. If it fails to stop at the open position, turn P2 anticlockwise until the green LED goes out. Afterwards set AUTO: 4 mA → 0%; 20 mA → 100%; between, proportional. Precise end positions are definable only in automatic.
  • 2.2.6 Torque protection check: while running open or close, press the corresponding torque switch manually: the red LED flashes and the protection must stop the actuator. The protection unlocks automatically on reverse rotation or power loss.

(3) Fault improvement

In service the servo sometimes fails to trigger open or close, or the small relay contacts burn from arcing. Beyond replacing spares, try: if the servo board fails, disconnect the two small black plugs (to the small relays) and wire the servo's two switch lines to the upper terminals of the main contactor coil, disconnecting its original 220 V (powered contact). If the servo output is a dry contact, keep the original 220 V line to the coil, wire the servo switch lines to the lower terminals, and earth to terminal 19.

References

  • [1] Limitorque Corporation. L-120 Series Type 10 thru 40 Instruction and Maintenance Manual. USA, 1994.
  • [2] Hou Dianlai. Improvements to 125 MW unit control systems. Control & Transmission, issue 9, 2004: 47-48.

Related Reading


Support:Shandong Juxi Electromechanical Equipment Co.,Ltd.    Tel:+86-13853147838     Email:actuators@163.com    WhatsApp:13853147838/18678894019
© 2006-2026 China Electric Actuator Network